
JeeNode + MinipH + LiPo + Case = Wireless pH sensor
This sensor is probably the one I’m most proud of so far, all the elements came together really well despite having to hack the MinipH circuit in the literal sense!
The enclosure maketh the project
As soon as I had finished making this sensor, and put the lid on and stepped back, I was genuinely surprised and pleased with how much better the sensor suddenly seemed. Despite the fact that I knew exactly how much sweat and tears had been expended and all the clever details, even then, I was mostly impressed when the case went together!!
At first I was a bit disconcerted by this, I am constantly trying to see the ‘real substance’ of things, ideas and people, rather than just see the ‘surface’ details. And yet, even with a project of my own that I knew intimately, I was beguiled by the case.
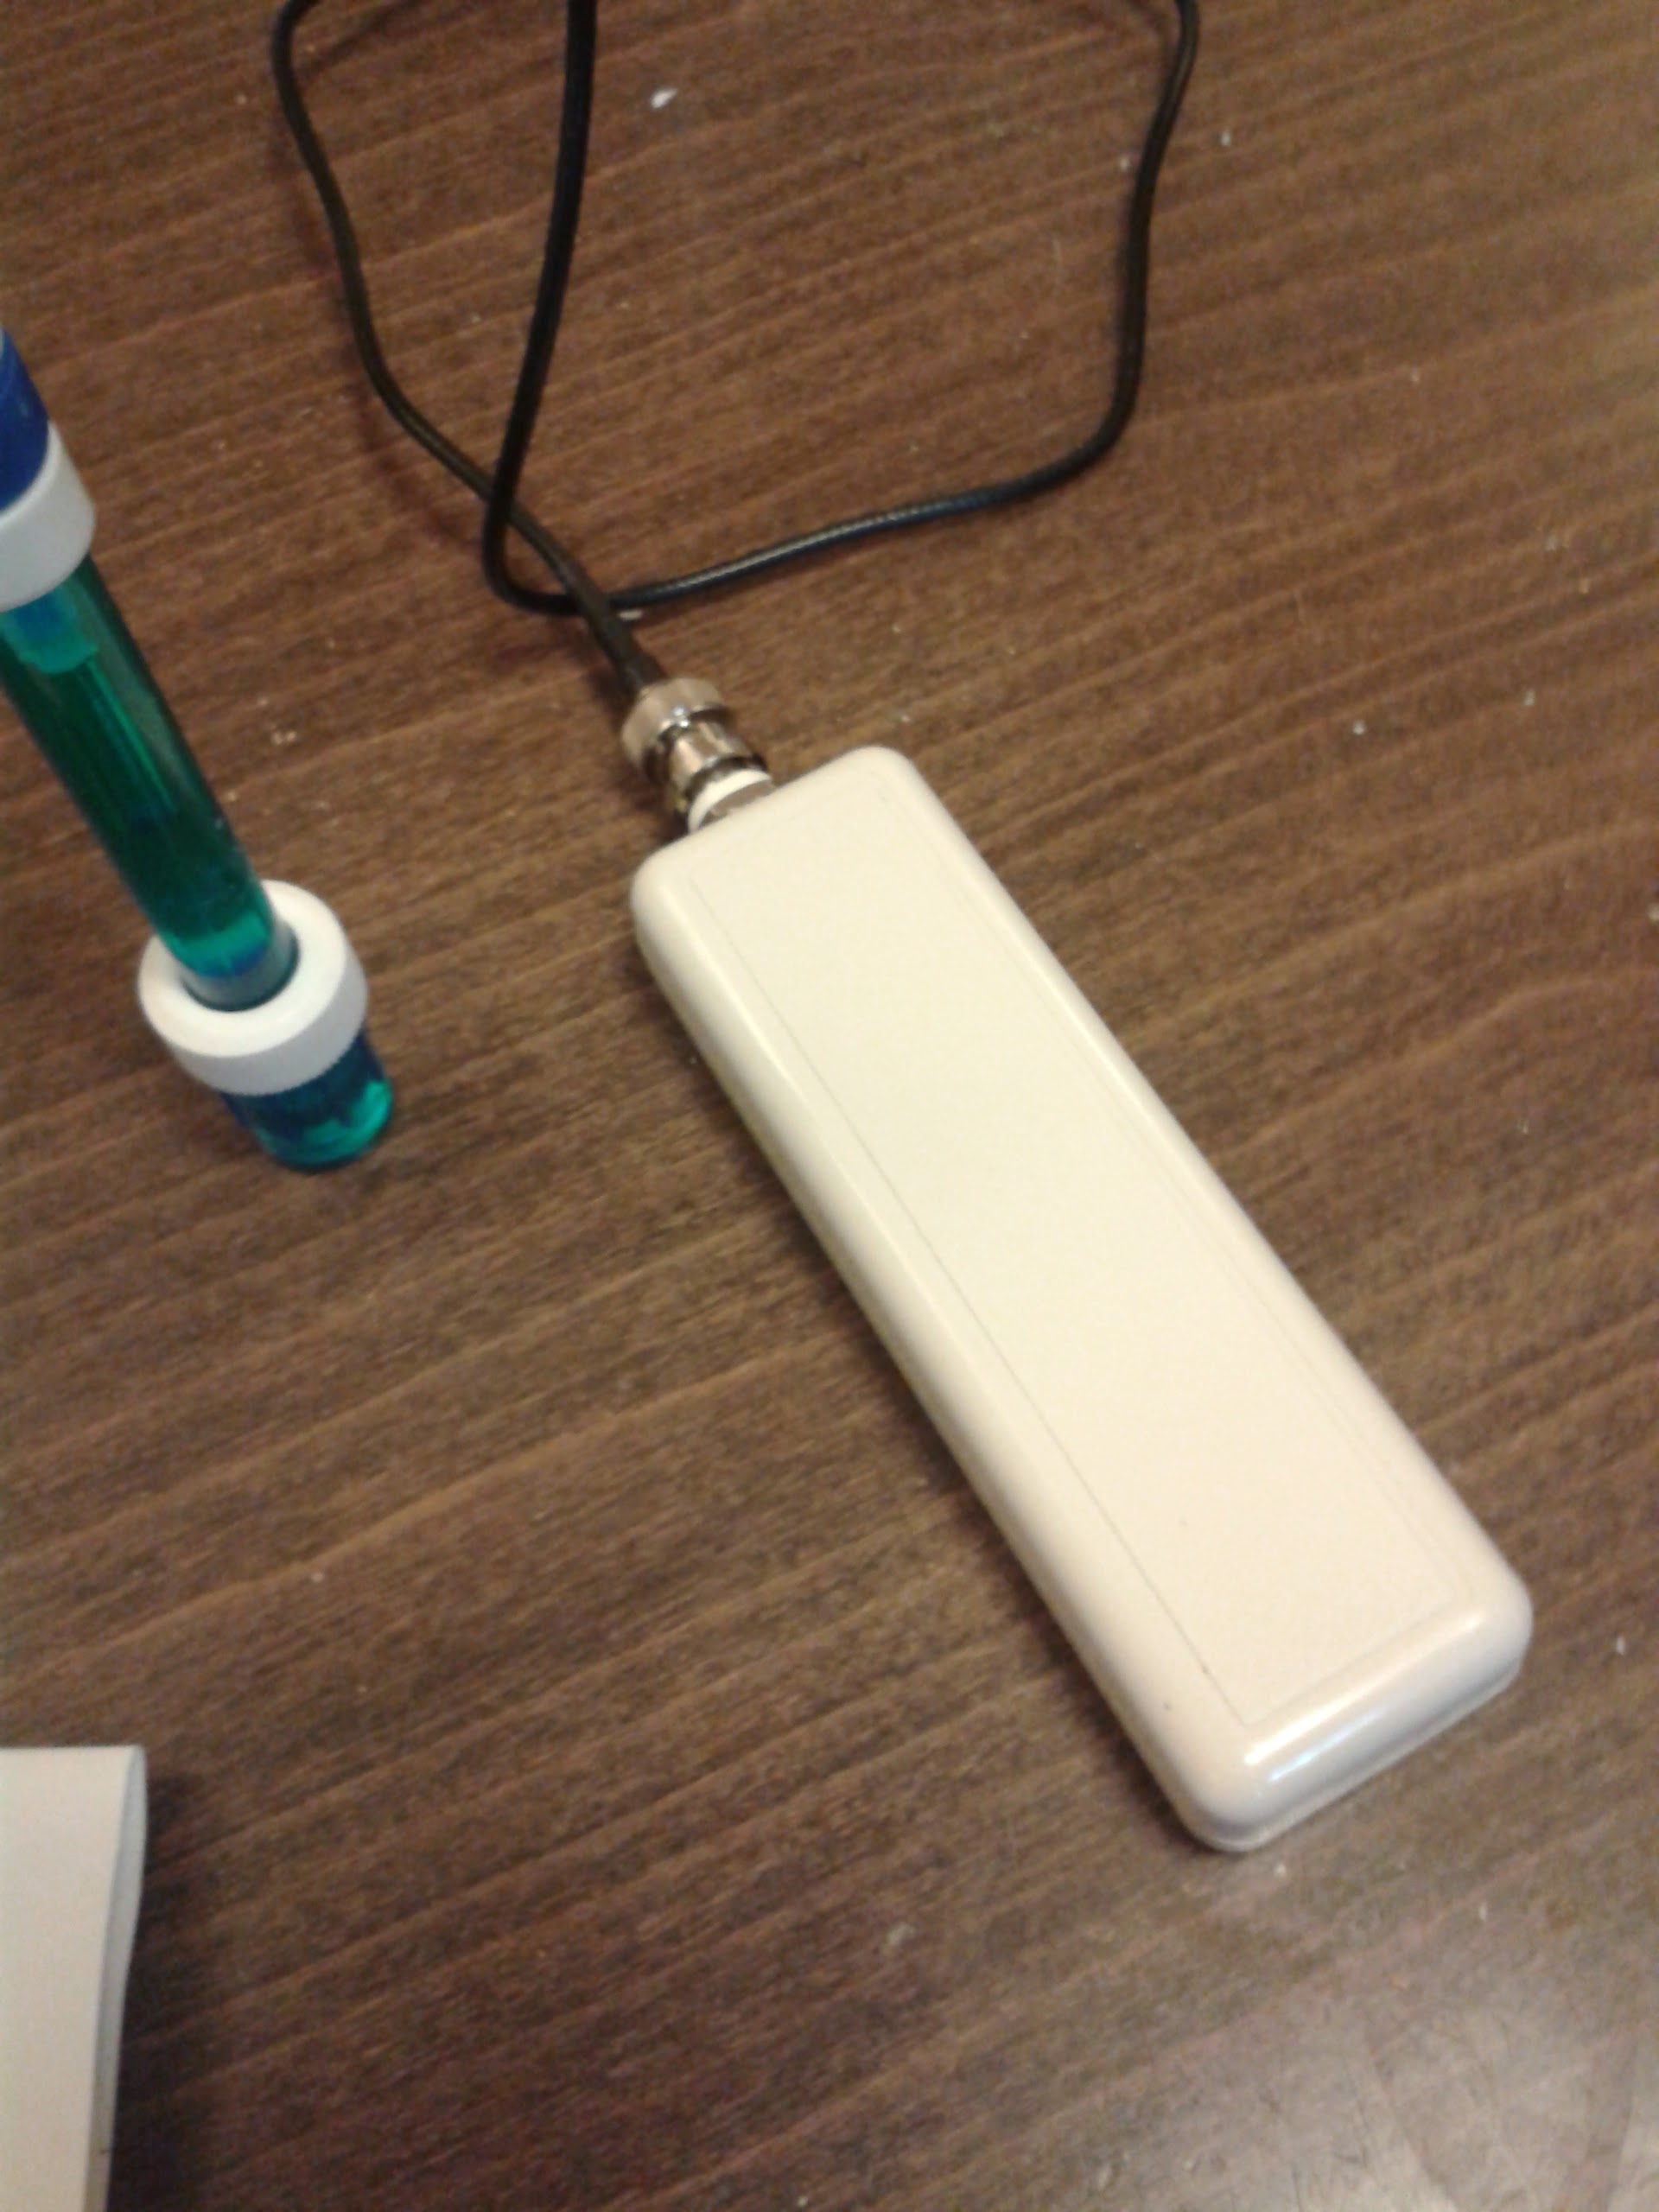
So anyway, the case turned out to be the perfect size, the quality of the plastic (ABS) and surface finish is very good, the sides feel strong and mate well with each other. It’s made by Evatron, model PC001 and I ordered a black and white one, both with and without a battery compartment from CPC in the UK (£4.54 with free delivery).
I prefer the look of the white one, its not trying to be Apple white (they’ve probably patented that one) but it’s not beige either – I suppose ivory is a fair description. The battery compartment option tempted me but I decided in the end that it would never be moisture or splash-proof let alone waterproof with a door.
Construction details
One of the first and easiest decisions was to remove some of the little plastic mounts intended for internal pcbs, they just get in the way. I snipped most of them off with heavy duty wire cutters and then used a sharp chisel to cut the remains of the plastic flush to the surface. Then the hole can be made in the middle of an end, it needs to be 12mm to accomodate the BNC connector of the pH pH probe circuit. I find that it’s very difficult to drill holes accurately without a pillar drill, especially in this sort of situation where the hole needs to go in the middle of where the case splits. However, it is perfectly possible to mark out pretty accurately by careful measurement and ‘eyeing’ up the marks from several angles. So I just marked out the hole as carefully as I could, then drilled it roughly in the middle at 10mm. I then used a file to remove the rest of the material and return the hole to a centred circle. I tried to retain a flat on one side of the hole, to match the mounting pattern of the connector, but it’s not vital.
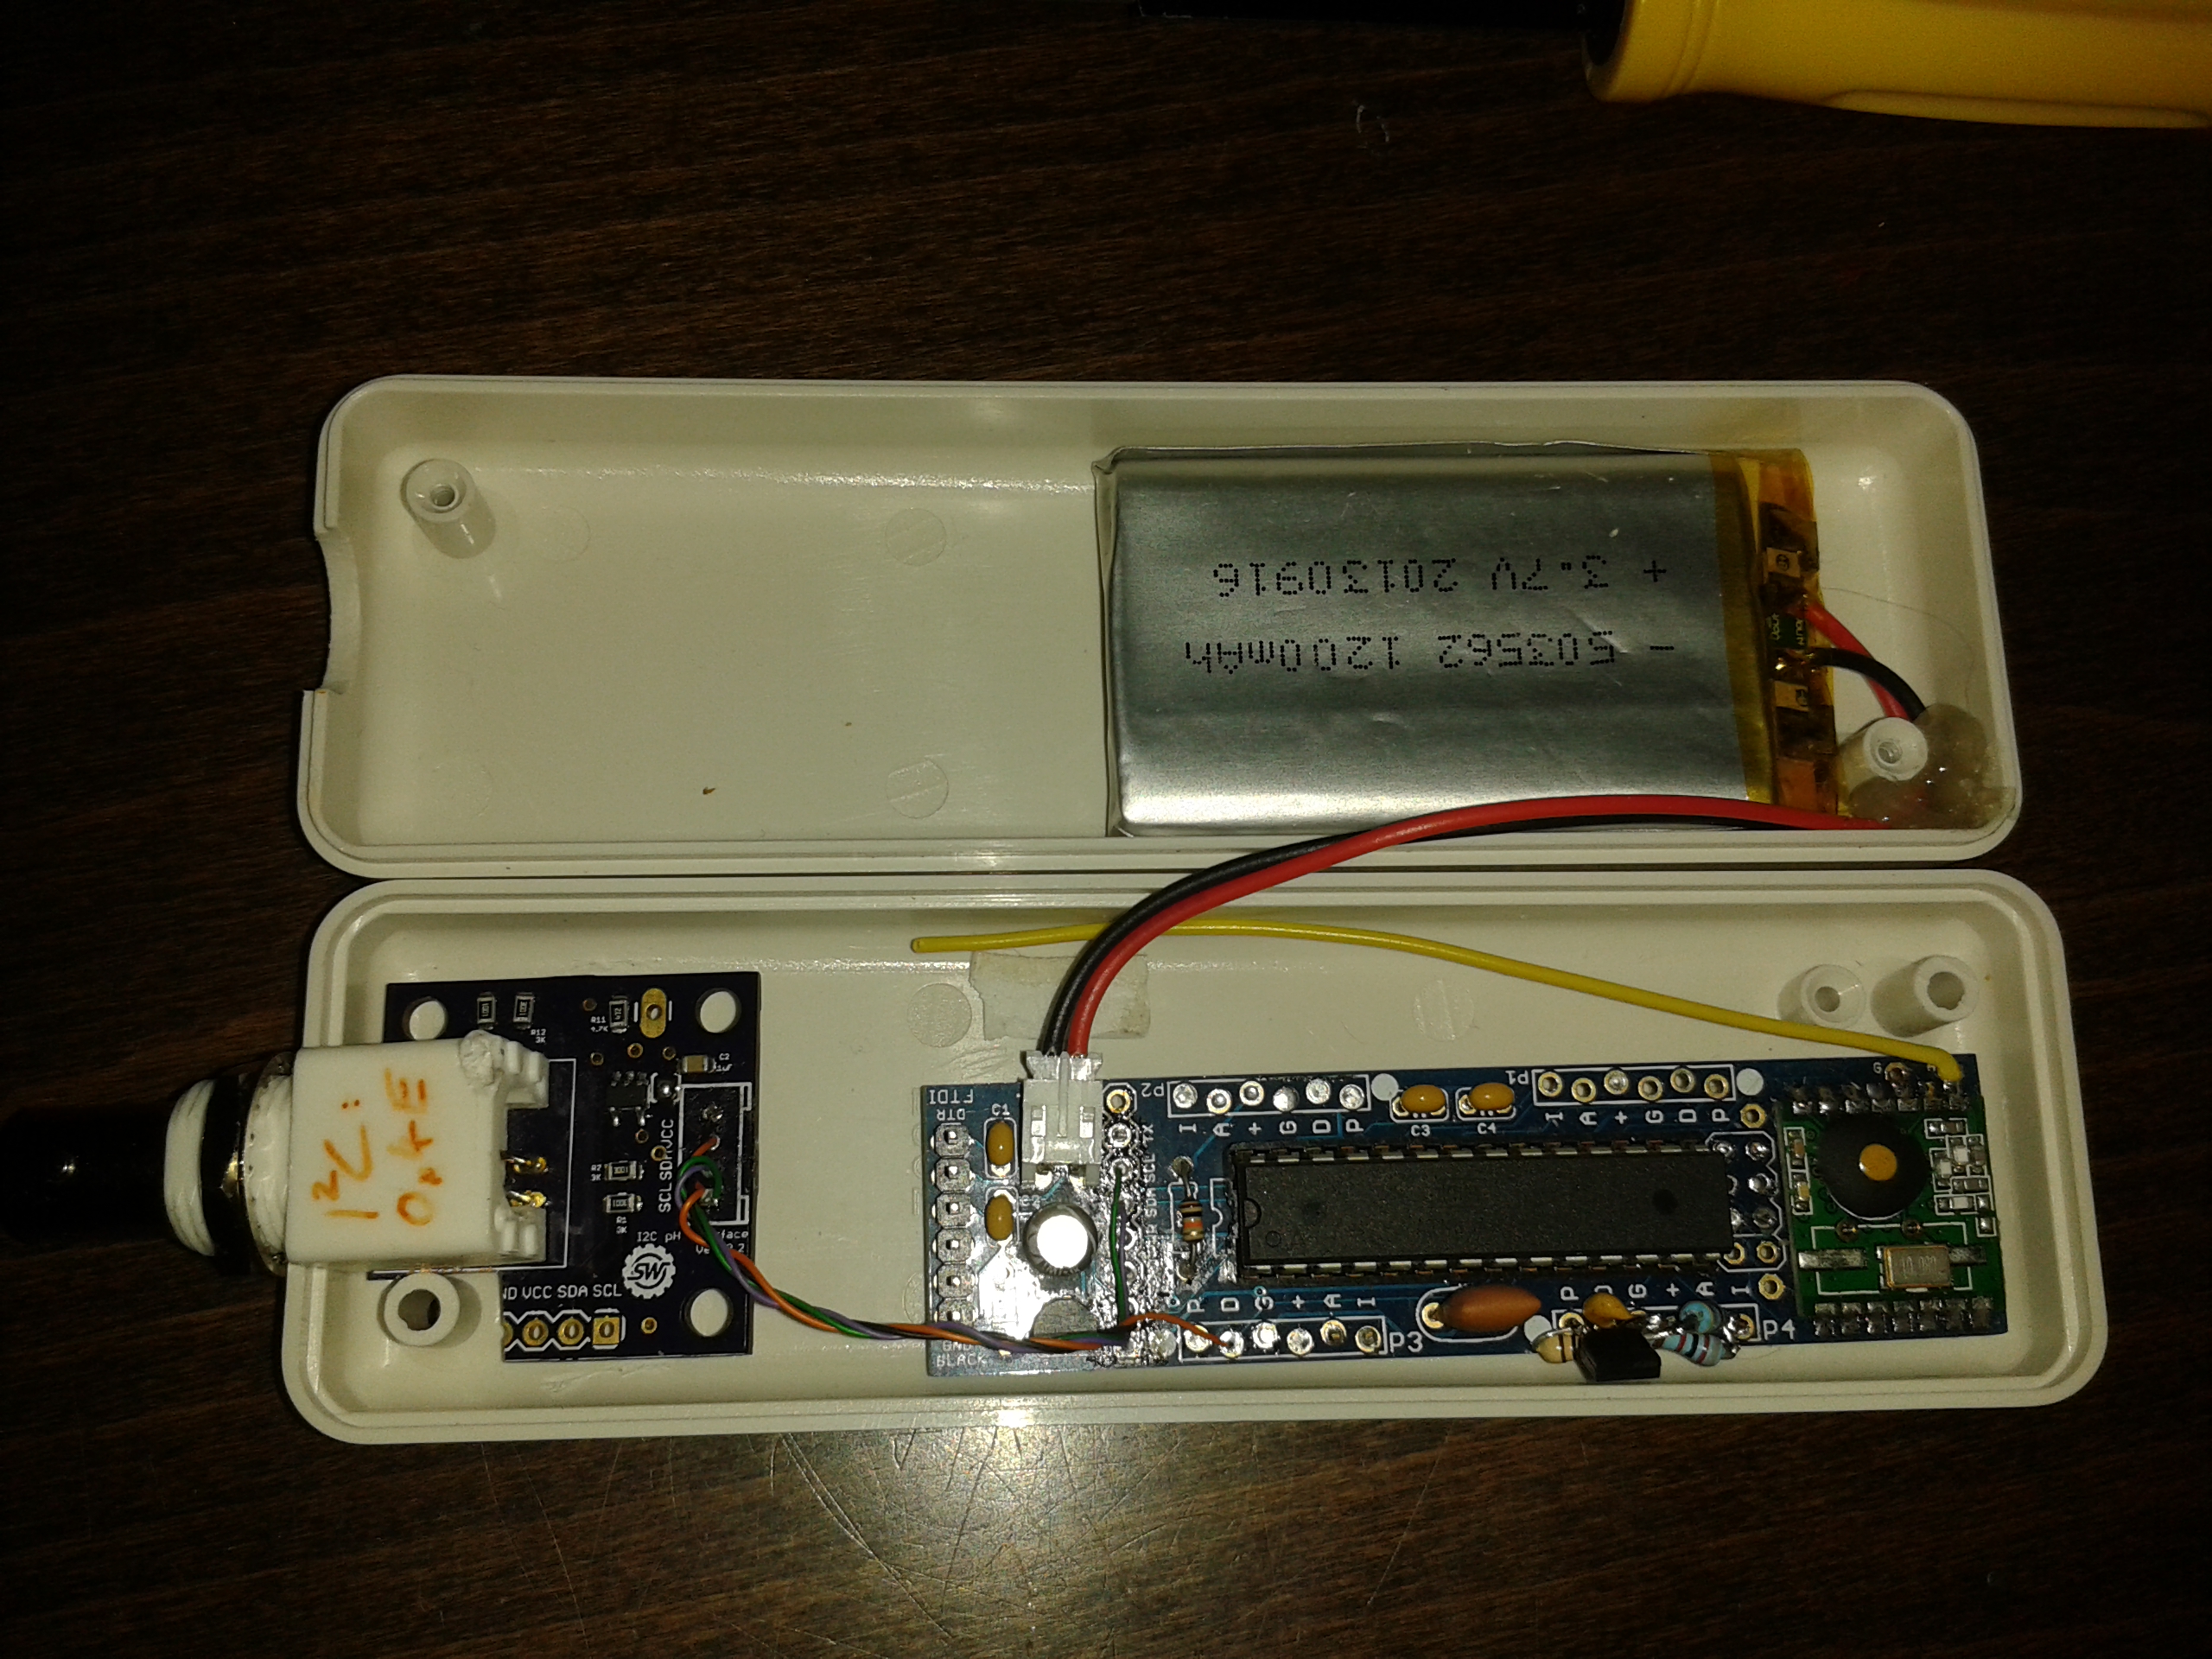
Now in order to fit the pH sensor circuit we need to hack it – this time with a fine hacksaw. I spend quite a few minutes examining the board layout files (yet another reason to love open source hardware!) and a load more time examining the physical circuit, and became convinced that there weren’t any traces or components that I’d be damaging. The physical construction of this type of circuit is important, but I reassured myself that I wouldn’t be breaking any guard traces, just clipping off a bit of ground plane.

Needless to say, despite my brave words I was more than a bit apprehensive to take a hacksaw to such a perfectly formed little board. Perhaps this is what novice surgeons feel the first few times they have to cut into somebody? Anyway the operation was a success, and the patient was able to make a full recovery, minus a corner.
The MinipH circuit is from Sparky’s Widgets – aka Ryan Edwards – another hacker hero of mine! (I think I’m going to have to make a page of them soon). He has some great info on his site that really helped me understand some of the more subtle aspects of pH measurement.
I decided to use the hardware I2C port rather than the software ports provided as part of JeeLib – I figured that perhaps the processing overhead might be a bit lower, but I haven’t tested that assumption. The demo sketch provided with the hardware worked great out of the box, and Naomi then wrapped it in a class and got the data sent over the radio.
The only other fiddly detail was getting the power consumption down, as the circuit consumes a few milliamps constantly. I tried a few different ways to power the circuit and eventually settled on using a digital out to raise vcc high when I need it. The draw of the circuit is well inside the limits for the IO pins, and it seems to work fine. This way I can sleep most of the time and only switch on the sensing circuit when required.
I did some testing and found that the pH circuit needs quite a bit of time to settle, and I ended up allowing five seconds for the circuit to ‘warm up’ before reading from it. Even then the results often carry on dribbling up (or down) for quite a while. So rather than a pattern of ‘wake up, measure, sleep’ that we’re currently using, in the future we’ll be implementing a scheme where the sensor wakes up, keeps the pH circuit powered up for some time whilst taking measurements, then sleeps. Of course the mcu/radio can be sleeping during most of the measurement time, but the sensor would remain powered up.
In an ideal world I’d like to do some more clever work in software to measure the speed of change and basically predict where the results will settle. This should give a fast reading despite the pH probe actually taking ages to settle. And also, let’s face it, getting pH accurate to one decimal place is great for most situations, and the extra place may be questionable anyway as I’m not sure the accuracy is quite equal to the resolution.
And finally, the battery is from Adafruit, as detailed in the overview page. With a sleep current of 7μA against a capacity of 1200mAh, we should be good for a couple of years I reckon, even if we spend a fair fraction of one percent of the time awake.
The microcontroller sketches that configure and then run the sensor are available over at github – we are developing a system based on Node-RED to receive the data that you can also download from github. I hope that you find our work useful, and build something yourself with it, just as we’ve built on the astounding work of so many others. Happy hacking!!
Hi!!
I would like to ask you more information about this project. It looks really nice!!
Can you use this device to send the data to a Raspberry Pi?
Thanks!
Hello Jesus
Yes, this sensor is designed to send data to a Raspberry Pi. The navigation of our site is a bit messy at the moment – here is where I explain the hardware and software to get the Raspberry Pi side up and running: https://l0l.org.uk.archived.website/2014/05/commands-get-node-red-controller-raspberry-pi-rfm12b-support/
What kind of EC and PH probes did you use? Could you send me more details about them?
We used the cheapest ones we could find on ebay! the pH worked out fine, although you want to have two or three probes in case one breaks or is doa – at these prices this shouldn’t be a problem. We haven’t verified the EC part yet – it’s on the todo list for this month – watch this space. We’ve got probes and a circuit now from Sparkies Widgets so we’re ready to rock!
Any update how the EC probe worked out? Did you get one that you could leave submerged?
Hiya Shannon – sorry to say I haven’t started on the EC probe yet as I’m still hoping to get system 3 working with the ESP8266 chip – if I can’t get it working by the end of May then I’ll cut my loses and get it working under system 2.
The probe I’ve got is the cheapest on ebay – like this one: http://www.ebay.co.uk/itm/141591951248
Not sure if it can be submerged – at this price point somehow I doubt it though….