
NB: I no longer think this is a good way to do this! It was a first go, and there is a lot wrong with it. I intend to revisit the web-page idea at some point, and will post something better then.
Now we use Freeboard to display data – there is a freenode node for node-red in the contrib section – it makes it super easy to setup and configure. See http://incredibleaquagdn.no-ip.info/?load=dashboard.json for an example of how it looks.
A simple node-red web page
In the aquaponics installation we’re working on, node-red is running on a raspberry pi controlling an aquaponics system. It receives mqtt messages every second containing the readings from various sensors.
I wanted to create a simple web page that displays the data from each sensor, updating every 2 seconds.
I’m quite new to the Internet of Things and to event-driven programming in general, so if you are already an expert you will probably think my solution is hacky for all the wrong reasons. If so feel free to comment … constructively 🙂 For example, I suspect a “proper” node-red web page solution might involve node-red pushing data to the page in real time, but I’m going to keep it simple here and let it poll for its data.
Components:
1. A web page (HTML and Javascript) that sends an HTTP request to node-red every 2 seconds and displays the data returned
2. A node-red object that knows the latest values of all the sensors
3. An httpRequest node configured to accept the page’s requests, triggering a flow that grabs the sensor values and returns them to the page via a httpResponse.
Http request and response in node-red
I jumped in with the node-red bit first, being the most fun. To simulate the messages containing sensor data I mocked up some streams of data using injectors.
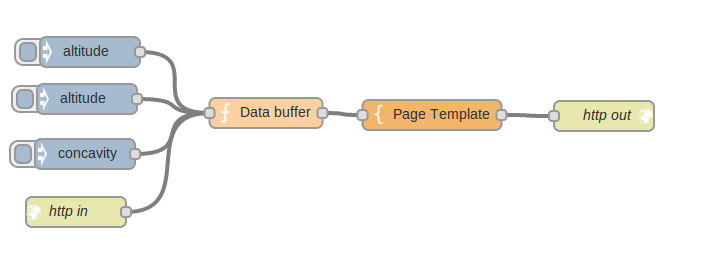
Data buffer
The data buffer keeps hold of the latest sensor data, passing it through to the http response when a request comes in. It works like this: when a message arrives on a sensor data topic, it updates its array of sensor values, and exits. But when it receives a message via the http request node, it adds the latest data into the message object.
context.data = context.data || new Object();
switch (msg.topic) {
    case "concavity":
        context.data.concavity = msg.payload;
        msg = null;
        break;
    case "altitude":
        context.data.altitude = msg.payload;
        msg = null;
        break;
    default:
        msg.data = context.data;
}
return msg;
Page template
This is the html for the full page.
Hello there
Altitude: {{data.altitude}}
Concavity: {{data.concavity}}
Other configuration
The http request node is configured for the url /boo and the GET method. The http response node needs no configuration.
Full flow
[{"id":"66f381b0.990c8","type":"http response","name":"http out","x":657,"y":233,"z":"ad00793e.52ff88","wires":[]},{"id":"ec3dfdc9.13c2","type":"http in","name":"http in","url":"/boo","method":"get","x":129,"y":329,"z":"ad00793e.52ff88","wires":[["ab90d0fa.546f3"]]},{"id":"cad43099.352bd","type":"template","name":"Page Template","template":"Hello there <br />\n\nAltitude: {{data.altitude}}<br />\nConcavity: {{data.concavity}}","x":485,"y":232,"z":"ad00793e.52ff88","wires":[["66f381b0.990c8"]]},{"id":"1c8929d0.e376d6","type":"inject","name":"","topic":"altitude","payload":"3","repeat":"3","crontab":"","once":false,"x":140,"y":216,"z":"ad00793e.52ff88","wires":[["ab90d0fa.546f3"]]},{"id":"315341ba.ceacbe","type":"inject","name":"","topic":"concavity","payload":"65","repeat":"2","crontab":"","once":false,"x":138,"y":271,"z":"ad00793e.52ff88","wires":[["ab90d0fa.546f3"]]},{"id":"ab90d0fa.546f3","type":"function","name":"Data buffer","func":"context.data = context.data || new Object();\nswitch (msg.topic) {\n case \"concavity\":\n context.data.concavity = msg.payload;\n msg = null;\n break;\n case \"altitude\":\n context.data.altitude = msg.payload;\n msg = null;\n break;\n default:\n \tmsg.data = context.data;\n}\nreturn msg;","outputs":1,"x":319,"y":230,"z":"ad00793e.52ff88","wires":[["cad43099.352bd"]]},{"id":"261b1fb8.d9e4e","type":"inject","name":"","topic":"altitude","payload":"2","repeat":"2","crontab":"","once":false,"x":143,"y":169,"z":"ad00793e.52ff88","wires":[["ab90d0fa.546f3"]]}]
If you deploy this and point your browser to localhost:1880/boo then you should see the (very simple) page. It won’t update automatically, but if you keep refreshing you should see the altitude changing from 2 to 3.
Node-red really is awesome. It’s amazing how quickly you can get something up and running, end to end. This delightfully bare-bones way of getting started was inspired by this node-red web page suggestion by knolleary here.
Auto-update using Javascript
Well I thought I was starting with the node-red bit and would have to go on to web servers and static templates and so on later. But in the course of looking for a simple way to add the auto-update functionality, I ended up with a totally node-red web page – everything about it is programmed in node-red.
There are two urls serving http requests – /web and /data. When you go to /web it serves up a simple page with a placeholder div and a js script. The script sets a function to run every 2 seconds. The function sends a request to /data and replaces the text in the div with the response, i.e. the latest sensor data (here mocked out by injectors publishing timestamps).
Auto Update Script
The auto update script node is also just a template but it contains the script that will kick off the auto-updating. The URL is hard-coded.
<script>
    setInterval(function(){
	    var theUrl = "http://localhost:1880/data";
	    var xmlHttp = new XMLHttpRequest();
	    xmlHttp.open( "GET", theUrl, false );
	    xmlHttp.send( null );
	    document. getElementById('data')
	    	.innerHTML = xmlHttp.responseText;
    },2000);
</script>
<div id="data">... Loading ...</div>
The result is that if you go to localhost:1880/web it should say “Loading …” for a few seconds and then start to display the data, updating every 2 seconds as required.
Future Improvements
Clearly this is just a proof of concept. Where to go next?
- Appearance. Present the data in a nice format on the page.
- Improve the code. The hard-coded url is yucky and the html markup is … minimal. Also something doesn’t feel right about having the js script as text in the template node, but maybe it’s fine.
- Add the ability to send requests in the other direction, from the web page and have node-red act on them.
- Add a download option for historical data
- etc.
Comments welcome
Have a nice day
Did you consider using web sockets to notify the page of a change so that it updates instead of polling? I appreciate you cutting and pasting the whole flow but it’s not very easy to read. Could you just post the individual function bodies?
I’ve edited the post to add in the function and template code in a readable format. Thanks Martin for that suggestion.
Do you have any helpful tips or links to get started with websockets and away from polling? (since polling is, after all, “for wimps”)?
If using (MQTT over) websockets, you could probably get rid of most of your nodes in your node-red project. To get started with MQTT over websockets, you can take a look here: http://www.hivemq.com/mqtt-over-websockets-with-hivemq/
If you want to dive into a real MQTT over websockets implementation, look here: http://www.hivemq.com/build-javascript-mqtt-web-application/
Thank you so much Naomi .. very helpful !!
I discover your work. I think you will be interested in http://thethingbox.io : a binary image ready to be flashed on a PI that contains node-RED ready for use.
Thanks Nicholas – that looks really interesting! I think we will try it out.
Any way to post or send your source so rest of us can benefit? I could not get it to work. Example is involved enough that posted code would be helpful.
Hi Jerry,
I think the code is all posted – what do you think is missing?
Sorry you couldn’t get it to work, but to be honest this is not the best way to do it anyway, as I have tried to make clear with the banner at the top of the post!
You are probably best off looking for a better way to do it – the internet of things is moving pretty darn fast, and I reckon someone else will have this covered, and much better, by now.
Best of luck!
hello
I copied the flow in my node red . But the page \web displays “loading” and the page \data cannot connect to server . What is wrong ?
Hi Frey Patrick,
You found a bug – sorry and thanks for pointing it out! It’s fixed now, please try again.
I did notice though that you said /data wasn’t working. The bug only affected /web, so it’s likely you have other issues with your setup (or ours!).
Do get in touch again if you want any more help.
Happy hacking!
Naomi
It will only work if you are running it on the host – otherwise change the IP address
So, it’s been awhile and you’ve never come back and updated/addressed a better way to do this. Is this something you still plan on doing?
Thanks for the prompt Wayne – I’ve updated the page to show how we now use Freeboard to act as a dashboard.
Hii.. Nice work. When i was running this in my linux pc, it was working completely,.
but now when i am running it on my raspberry pi, It shows only the page “.. Loading…..” but never redirect to next page. I am using the Raspbian jessy November image (Prebuilt with nodered). I just implemented your last code only, didnt made any changes even, still not working, on recently flashed pi.
I tried to troubleshoot the code.
I get the warning in data buffer in the line context.data = context.data || new Object();
I get the warning as “the object literal notation {} is preferable”.
Sorry to say I’m no longer working with Naomi who wrote this code and page, good luck working it out!
I appreciate the fact that you maintain this very useful posting.