
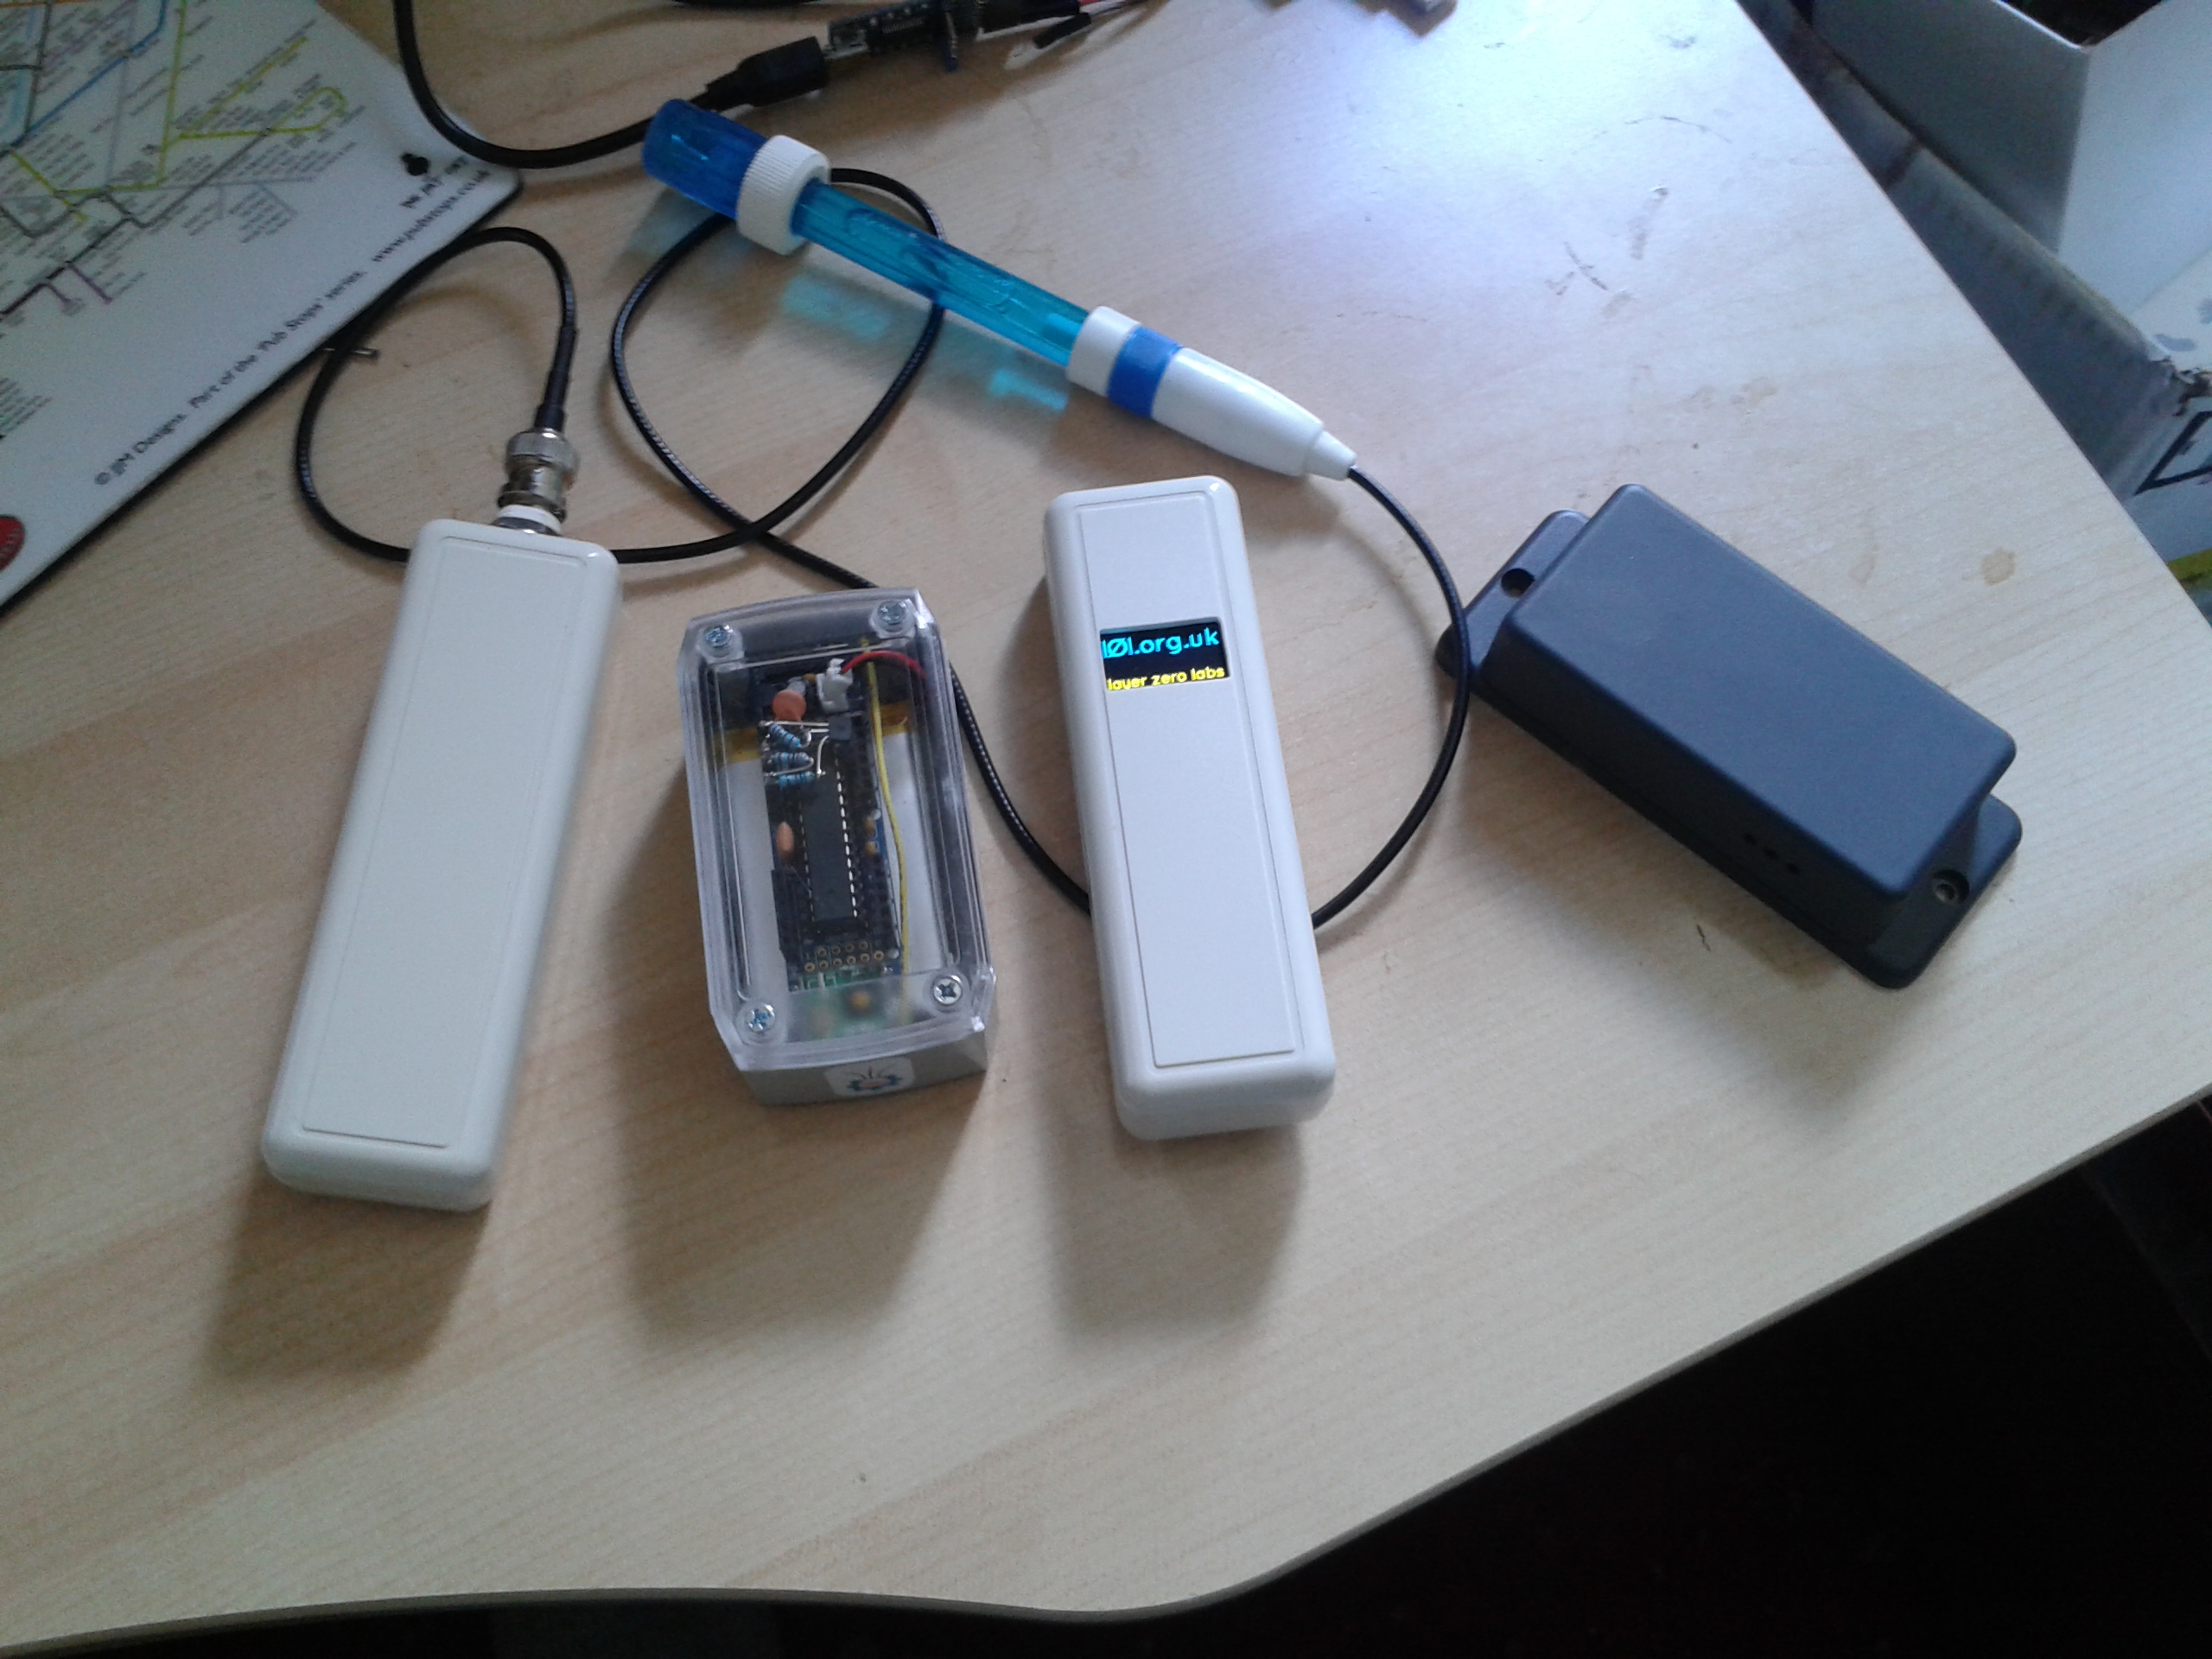
Here at layer zero labs, we’ve been busy making some wireless sensors to replace the wired ones we have been using.
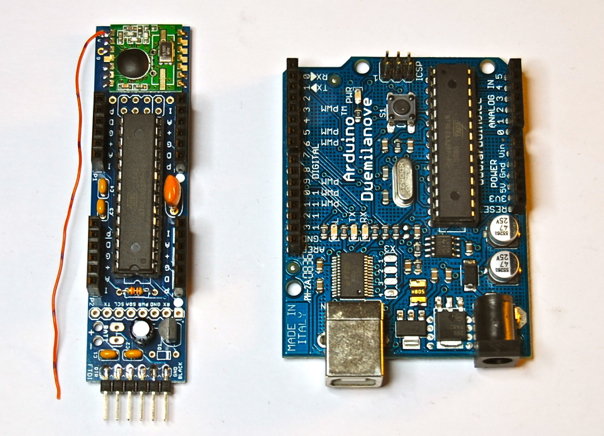
Jeenode – Arduino-based microcontroller with radio
After looking at a lot of options for micro controllers and radios, and a few that are starting to integrate the two, I settled on the JeeNode from JeeLabs because:
- Great design: small, low-power, well-documented and supported
- It’s fully open-source
- Active, supportive community of fellow hackers including many advanced users
- Mature and well engineered support libraries and example code
- Hardware is reasonably priced and ships locally (inside UK) quickly
So after deciding on the microcontroller/radio, then we start to look at power options. Most of the advantages of wireless are lost if you don’t have batteries, and there are a few different choices out there, the ones I considered for our sort of application are:
- Coin cell such as 2032 – small but low power, not rechargable
- Standard AA or AAA cells, cheap, powerful and readily available, but again not rechargable
- NiMH rechargable AA or AAA cells, rechargable but high self-discharge
- Lithium Ion – 18650 or smaller – great power density – slightly expensive and needs special charger
- LiPo – flat rectangular batteries – again great power – but not cheap and needs charger circuit
The microcontroller/radio needs 3.3v and I’d like to use just that for the sensors as well – these days almost everything can be run at that voltage and lots of the new stuff can’t run hotter. But each AA/AAA type NiMH cell puts out 1.2v – so I’ll be needing either a boost converter to raise the voltage – or 3 cells and a regulator to lower it down – and I find three AA cells an ugly solution. Its both a bit large and a bother to charge – both my cheapo battery chargers only charge in pairs for example so you have a single cell to charge – do you put it in a pair with a charged one or what?
JeeLabs do a boost board that uses a single AA battery but it adds a fair amount of cost. Although the design of the board is compact the battery board is inevitably quite thick. As the design continued to evolve I realised that if I could get the battery life into the years rather than months then being able to use commodity batteries was not such a biggie. If they were running out all the time it might well be handy to be able to run to the shops and get some fresh ones and be up and running again.
The thing about the self-discharge can be an ugly problem with NiHM, they are fine if you want to charge your camera or whatever to go on holiday for a few weeks etc. but after a few months, they will be loosing most of their capacity whether you use them or not! There are a couple of exceptions to this that I only discovered recently – most notably the eneloop type that have a shelf life of seven years!! But inevitably they are expensive.
LiPo Batteries

Anyway, all these considerations plus seeing lots of projects use the newish flat LiPo batteries prompted me towards that solution, and so I got a range of sizes and a few charging circuits from Adafruit and others to play with. I ended up favouring a 1200 mAh LiPo battery which is a good fit for the size of sensors I wanted to end up with.
I tried out some cheap no-name LiPo batteries direct from China but the quality was dubious – at the end of the day if they go wrong these things can actually catch on fire, with flames, toxic smoke, a whole nine yards of badness. Even the remote possibility of getting a call at 2am to tell me that my little project just caused a fire and toasted some people was enough to make me want to get the reassurance of Adafruit’s sourcing.
Let me declare a bias here – I love Adafruit on every level! Lady Ada is a hacker hero of mine and what she is doing with Adafruit is inspiring.
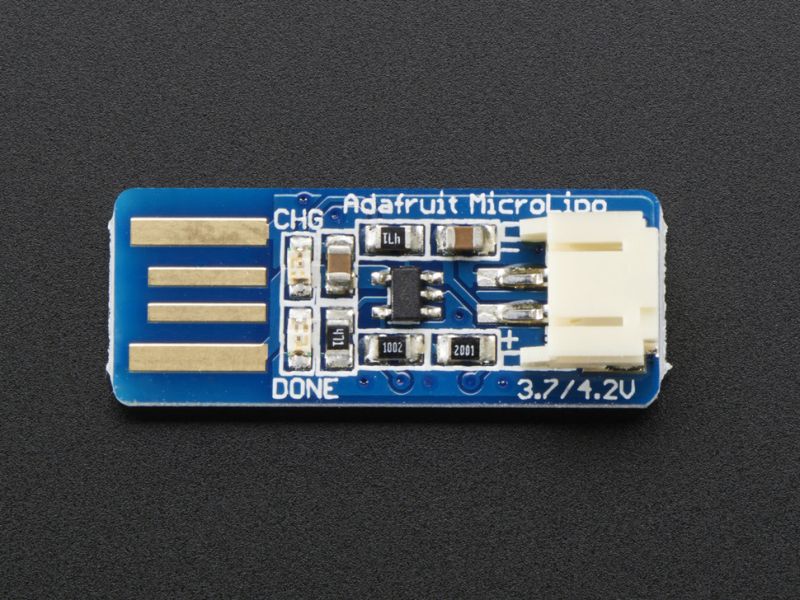
Their charger circuit is particularly cute – as well as working perfectly (natch). They recommend a really low charging current which I happily ignored – charging at 500mA is less than ½C and therefore absolutely fine and otherwise it would take all night!
This is part of the design which I consider still up for grabs. There are quite a few options I’m playing with, such as induction charging. Being able to recharge the batteries without opening the case or making a hole for the power socket would be a major win. One key design goal is to make the sensors waterproof or at least pretty close – it’s going to be used around aquariums and hydroponic setups!! So I want to minimise openings in the case, plus it’s really hard to drill and file holes and openings on small plastic cases by hand at home and get a good result for odd shapes. If I had a CNC machine ……
So anyway, at the moment the LiPo batteries have to be unplugged from the microcontroller so that they can be plugged into the charger:
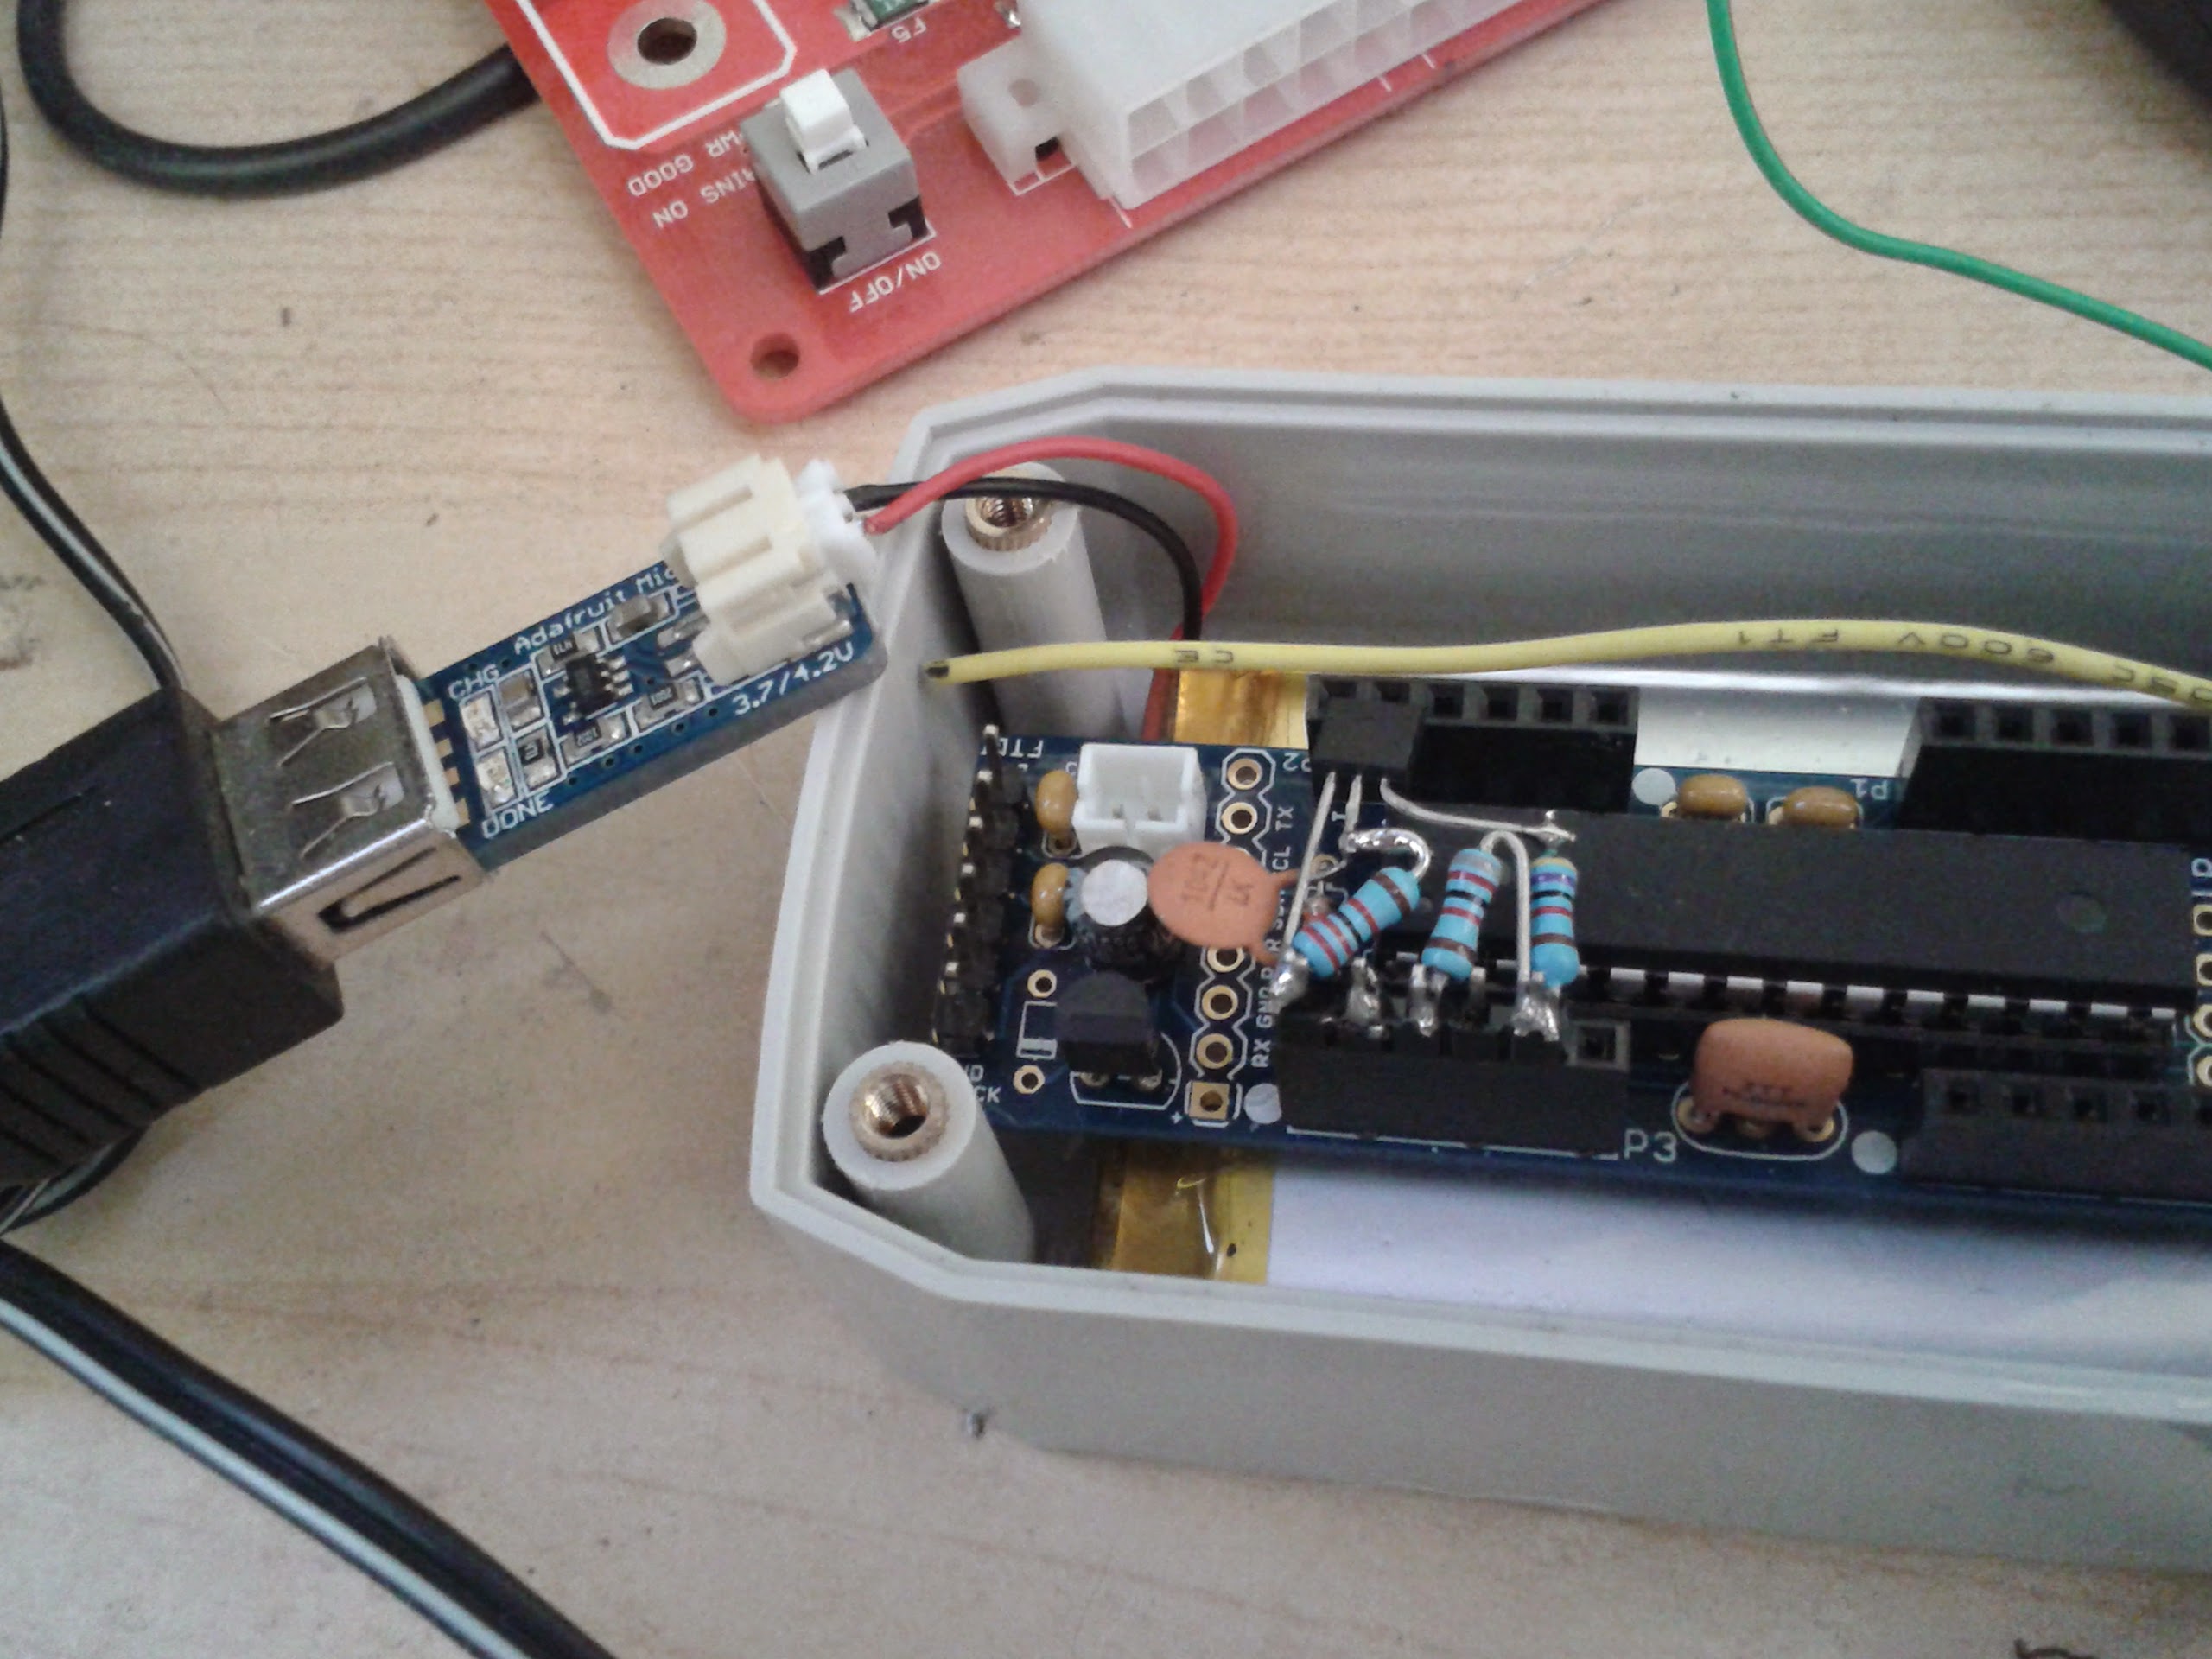
But I have got some ‘inline’ charging circuits that I could wire in, then you could plug a micro-usb cable in more easily. So that could be mounted inside the case, as it’s only needed every 15 months or so, or I could try to make an opening for it – but that would break my goal of minimal openings!!! ARGGG!!!
Design is all about making compromises between your goals, you spend ages going round and round working out which of your requirements you can compromise, which requirements you really need to meet, etc.
The other aspects of the sensors that are common to each one is the battery sense circuit. You can see it plugged into one of the headers on the JeeNode above. Here are a couple of versions of it – from now on I’ll be using the direct soldered version on the right – mostly because of the height of the headers!!

It is based on this one proposed in the JeeLabs weblogs. I’ve drawn it out below, (please excuse the crudeness but I could only find an old copy of DaveCAD from 1999 on an ancient cover disk):
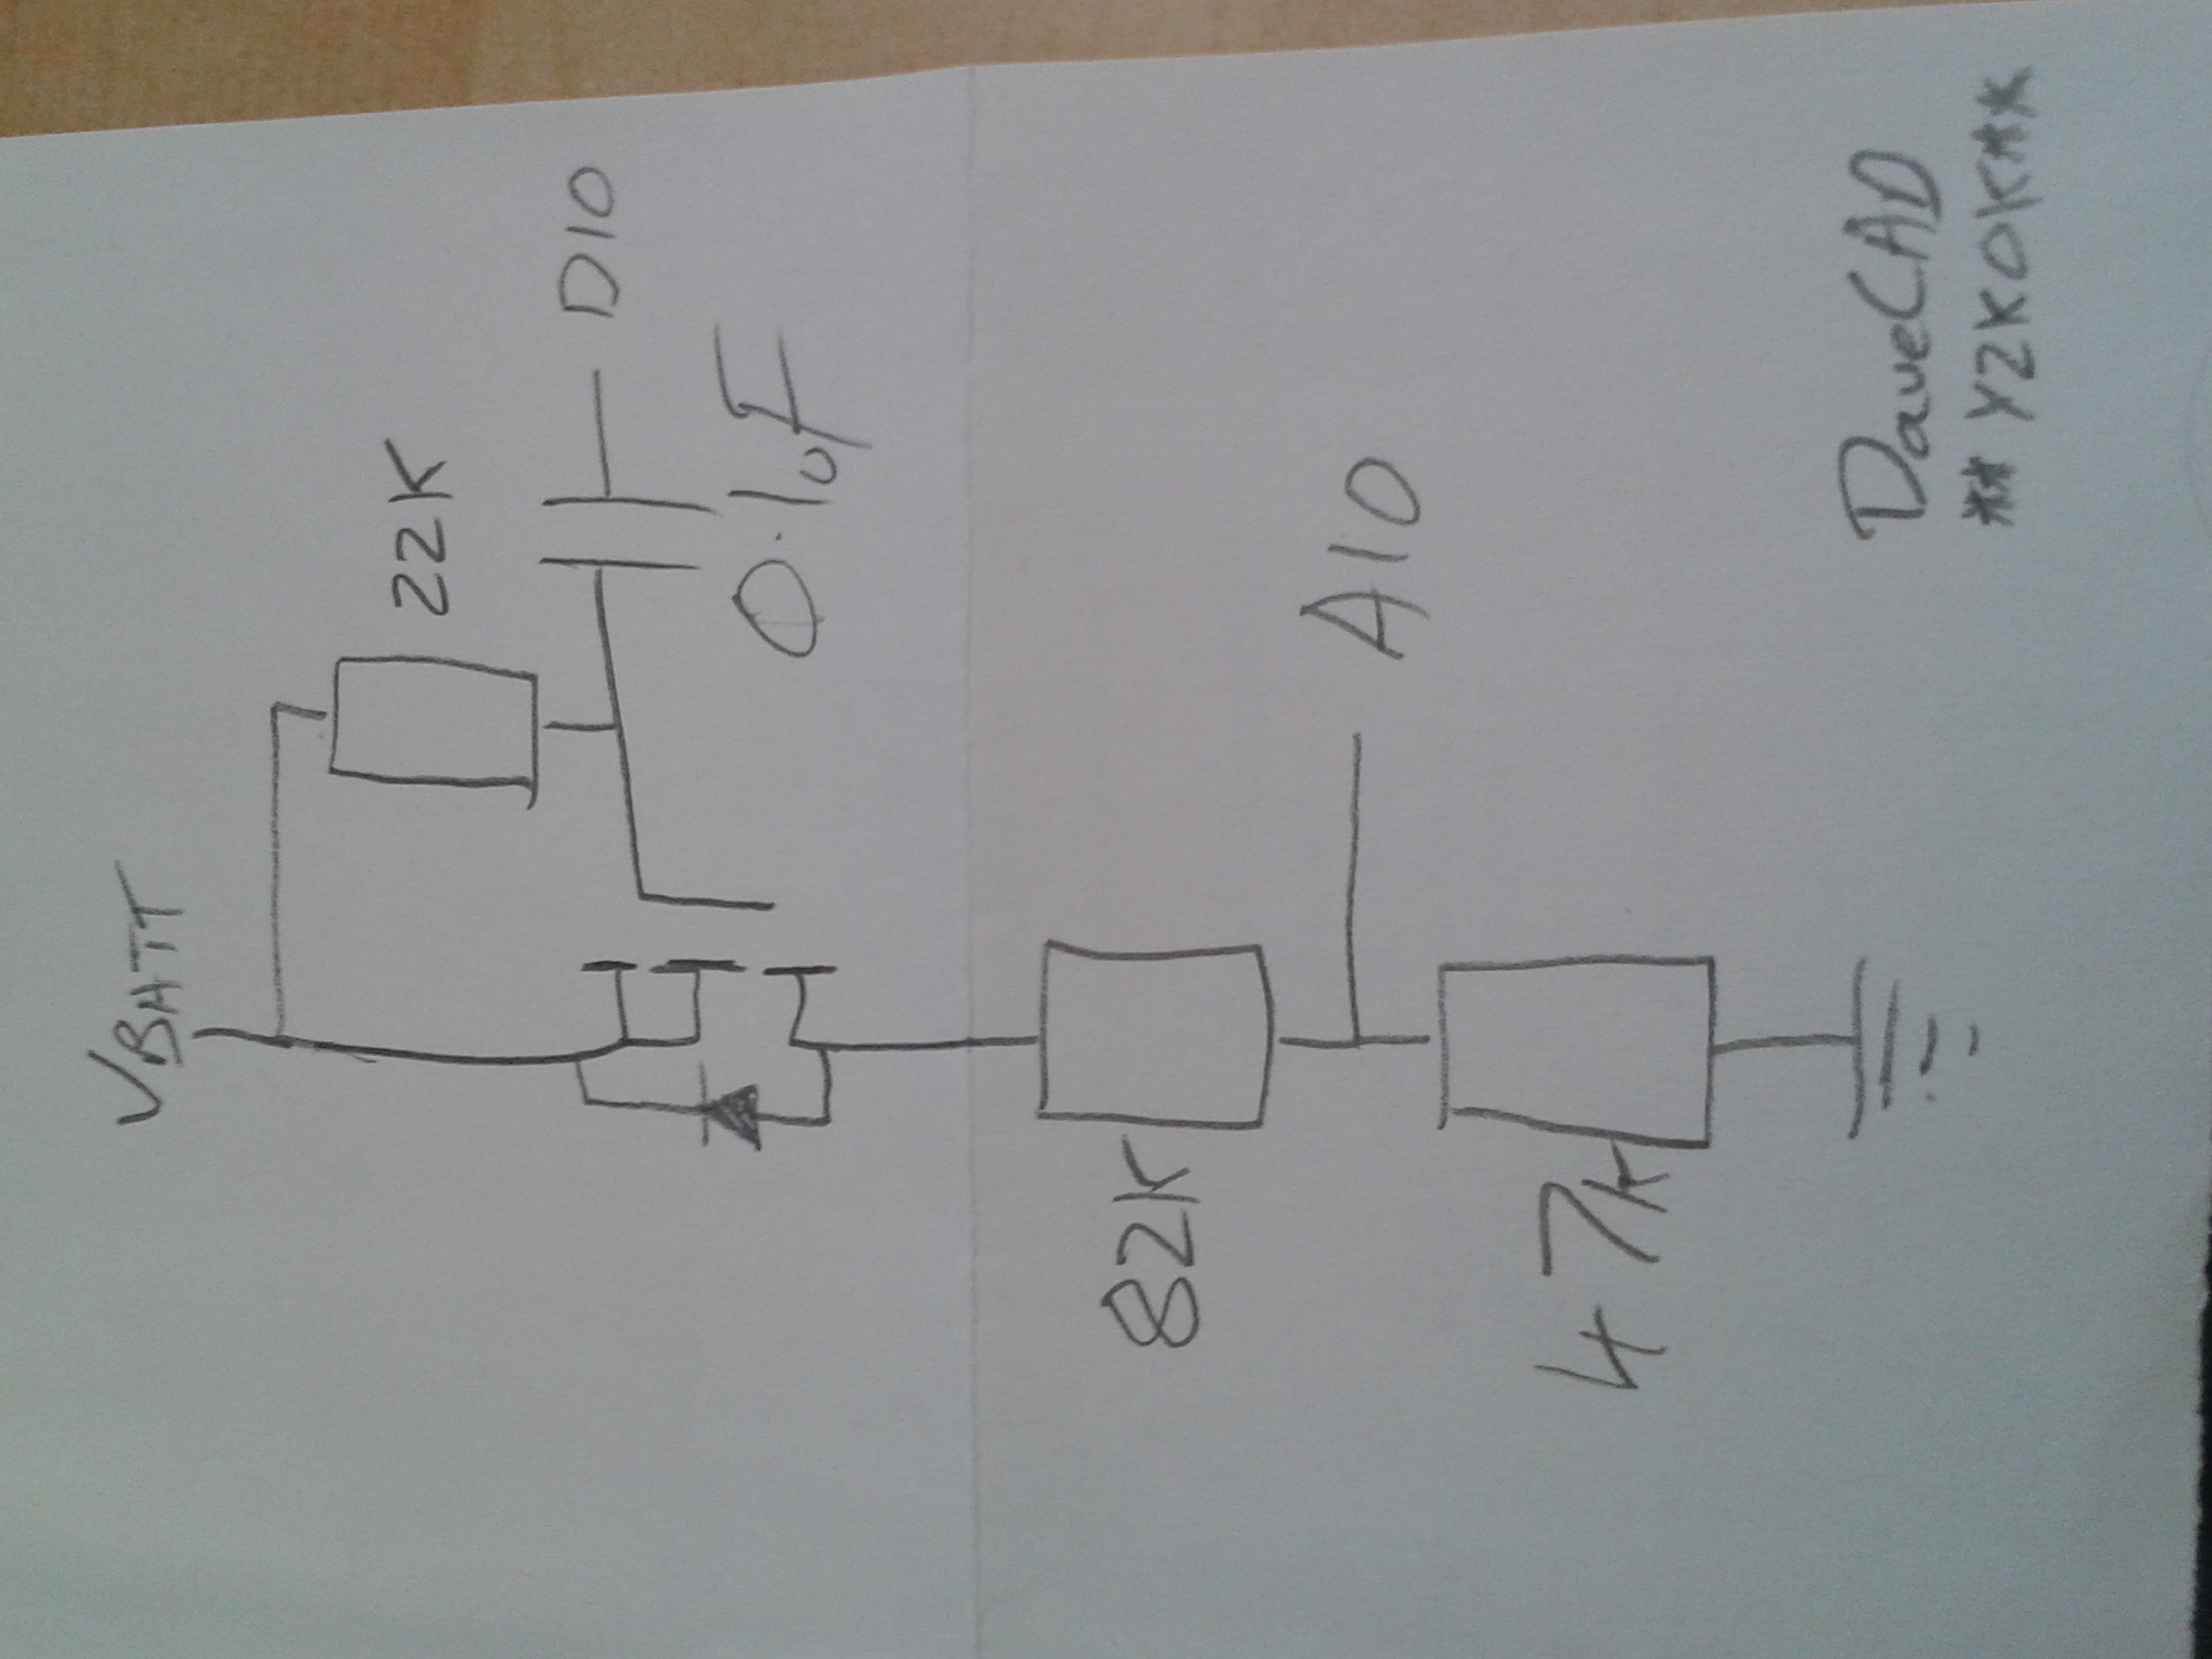
The basic idea is to try to measure the voltage of the battery using a potential divider across an ADC pin, but without having the circuit draw current when it’s not measuring. To do this we introduce a switching mosfet, rather than leave the divider connected up all the time. Now why bother with this, when the leakage current (from a higher resistance divider) might be only 0.2-0.3μA?
Well we are aiming for a single digit power consumption (in μA – millionths of an amp). So blowing .2 or .3 μA matters – it might mean a few more weeks of battery life. And, to be honest, I really got into the challenge to try and save every μA, it is quite addictive especially with my fabulous new μcurrent GOLD (thanks Dave Jones – another hacker hero of mine) to measure the savings after every tweak.
Question time
I am using a ZVP4424A mosfet which works fine – but I’m sure that there is a better one out there. Part of my problem is that I’m not sure what better is!! However I think it should be:
- Ideally a ‘Jellybean’ part – i.e. available from multiple vendors, not going to suddenly go EOL etc.
- Cheap
- Readily available
- Available in both through hole and surface mount
So if you can help educate me (and other readers) as to how to choose a better p-channel mosfet then please put your hand up now. Parametric search is a fine art which I’ve only half mastered. Thank you.
You might want to look at the JeeNode USB design… http://www.digitalsmarties.net/products/jeenode-usb
It’s a Jeenode, based on the SMD ATmega328, with built in LiPo charger which, importantly, works inline! The charging chip might actually be the same as the Adafruit one, the 5 pin package looks familiar.
Also it’s really worth having a look at JC’s weblog posts about power conservation and battery life, he has an obsession with low power consumption 😉
http://jeelabs.org/2011/05/21/still-running-on-lipo/
http://jeelabs.org/2009/12/19/battery-life-refinement/
He’s got some nice tricks such as completely powering off the radio via a FET and putting the ATmega into a deep sleep.
Hello TankSlappa – I recognise your name as one of the regular posters over a jeelabs forums.
Even though I’ve got a jeenode USB I’d completely missed the fact that they have built in chargers! Sweet! Thanks for letting me know that.
Although for my use cases, the battery is charged every year or two, so it probably is more economical to use cheaper jeenodes.
Also that way an FTDI chip is not wasted in each node either.
I am indeed a fan of JCW’s work partly because of his obsession with low power! I hope you can read the (old version DaveCAD format) schematic in the page above where I use his FET trick to mimize the leakage current of the battery voltage monitor?